Author Archives: iba23

Twine Tutorial

How to set the background of you webpage as an image in Twine

1.) Open up Twine and select and save the image you would like to use for your background.

2.) Once you have the image you would like to select, you need to go add a new stylesheet to your Twine project. You can add a new stylesheet by going to Story –>New –> Stylesheet

twine1

3.) This will take you to a new stylesheet that has not been filled in at all yet. Click on the stylesheet, and the empty one should look something like this.

twine2

4.)In the body section of the stylesheet between the curly brackets, indent and the place the tag “background-image:” in the stylesheet.

5.) After placing this tag here, you need to put the .jpg filename right after “background-image:”, but the image you want to use must be inserted using the code Twine uses to insert pictures. The format goes like this: [img[your_filename.jpg]]. And the whole statement must end with a semi-colon (;).

Twine3

6.)After this, you should have successfully inserted an image as your webpage’s background.


Final Project Proposal

For my final video, I’m going to do a sort of Kanye West tribute video since he’s my favorite artist. I plan on cutting a bunch of clips from YouTube of Kanye West in his music videos, concert performances, television appearances, etc. I would like to put all of these together in Adobe Premiere in a somewhat cohesive manner. Also, I’m going to take the audio from one of his songs and work with it in Audacity as well. In addition to working on one of his songs in Audacity, I was going to record my own voice over the audio on some commentary about Kanye West and who he is as a musician.

I want to keep this at about 2-3 minutes, around the same length as the first Adobe Premiere project. Going along with the first project I’d like to keep clips around 10 seconds, but I may take liberties with the project and make them around 20-30 seconds per clip. In Audacity, I’ll probably just maneuver the volume and work with some of Audacity’s effects to get the sound I think will sound best in the context of the video.

Text Preview

For my twine game, I’m trying to do a sort of flash fiction football game where the user makes a series of choices as prompted by the game which is supposed to simulate the last 10 seconds of the football game. The user is able to choose a play and make decisions about what to do during that play like an actual player playing in a football game would be able to do. I was really interested in making a game like this because it really is the tiny choices actual football players make that determine the outcome of a game. And I think this game does a little bit of the same.

I plan on implementing football images onto most of the pages. I think it would help the user experience the game a little bit better. For example, where the user has to make a decision about what to do when confronted with a defender, there will be a picture of a linebacker or a defensive back attempting to tackle a runner.  Also, in the start screen, the coach speaks to the user, so I put an image of a coach to make the experience a little bit more realistic. I think this will also make it a little bit more interesting for the user.

Revamping the Hill District

I’m in the group who had the topic of revamping the Hills District. Starting out, I didn’t know too much about the Hill District except that it was a part of Pittsburgh which had been on the economic decline for a while now. After looking into the Hills District a little further, it turns out that this economic decline is due to the Civic Arena being built there, which ultimately cut off ties from surrounding areas. And this led to residents leaving and businesses being closed down. I personally think the Hill District has an interesting history that deserves to be told, and I think part of our group’s plan can be to find a way to tell that movie.

Some ideas I had were maybe to do a small film portion where shots of the Hill District could be taken while audio of our group talking about its history could be going on. We can discuss how it got like that to inform an audience, and explain where we want it to go. It would be a mini-documentary sort of thing. Also, as far as scaling this project out, I think it works well for the topic we have chosen. Part of revamping the Hills District would be a lot of community projects and outreach events and stuff like that, so a potential idea for scaling out would be writing “proposals” to submit to local government to get events approved. These events could actually help in turning around the Hill District.

Silencing Audio in Audacity

Step 1: Select the audio that you want to work on. This is going to be the audio that you will silence a portion of. This screenshot shows the selected part of the audio track that I am planning on silencing.

audio1

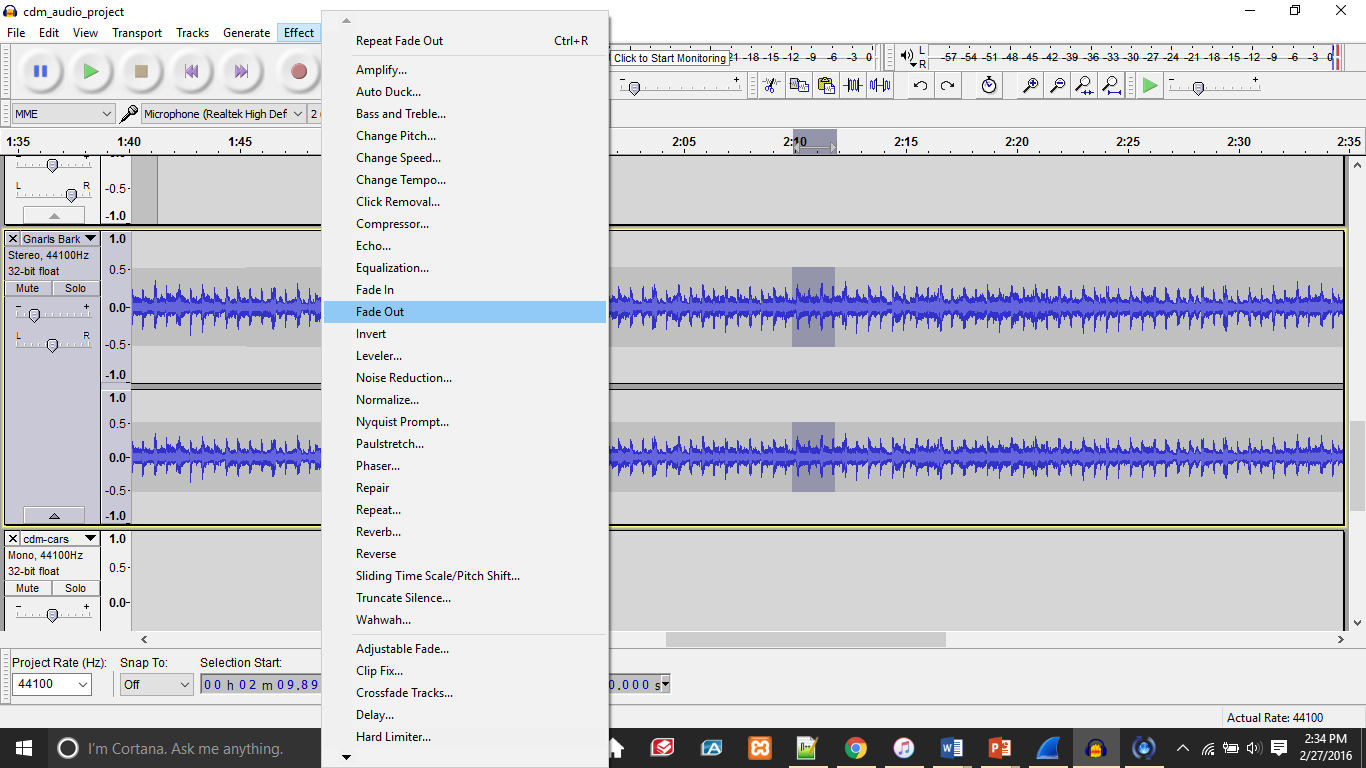
Step 2: I selected a small section before the place where I want to silence the track, and click to fade it out before silencing the upcoming part, so the silence sounds more natural. I do this by going to effects and clicking Fade Out as you can see in the screenshot below.

audio2


Step 3: I then take the selected portion of what I want to silence, and I go up top to the tool that say Silence Audio. After clicking that button, the audio is silenced.

audio4


Step 4:  I then select a portion of the audio track after what I silence to fade it back in naturally. I select Fade In from the Effect tab, and that sound fades in.

audio3

audio5

Audio Preview – Soundscape

For my audio project, I’m planning on telling a story about something I experienced while I was in high school, similar to the way the actor told the story in podcast we had to listen to last week. It’s particularly funny and I think it will be interesting to listen to. It centers around my friend who was dating this girl a few years back, and they probably had one of the most dysfunctional relationships I had ever seen. So, my audio project will kind of follow me through this certain day where I actually witnessed something truly hilarious happen between the two. I plan on interjecting certain sound effects into my brief story wherever I think they fit. In addition to that, I plan on having some background music playing in the background while I’m speaking to make the story a little bit more interesting. I’ve also already decided to include Gnarls Barkley’s “Crazy” as the intro to my audio project because the story I plan on telling in my audio project is incredibly crazy.

The specific audio I’ve recorded and plan to use in my soundscape project is the door knocking sound. I just recorded it by knocking on my own bedroom door. I may adjust the gain if I need it to be louder in the context of the entire project. But, the door-knock comes in because I will knocking on another friend of mine’s door when I get to his house. And it is at this friend’s house where the entire situation I’ll be describing goes down. I’ll be placing it when I mention arriving at this friend’s house.

Limetown Podcast

One of the moments where I really noticed the sound design was around the 3:00 minute mark of the Limetown podcast. The sound editor mashed together a bunch of sound bites from news programs detailing what happened in Limetown. But, it was how they did it that actually had me impressed. A sound bite would rise in volume, the listener would pay attention to it, and then it would fade out just as another sound bite would come up. While it seemed like a normal sound function at first, I noticed that the sound bite that was faded out was still going even while the next sound bite was playing. In addition to that, there was still the ominous music in the background. So, the techniques seemed simple at first actually turned out to involve a good deal of layering of sounds.

Also, another technique that impressed me from this same situation was the fact that there was also some maneuvering of sounds with the Left and Right of the speakers. Sound bites tended to start on the left side of speaker and move to the right side of the speaker (or vice versa) as it began to fade. For some reason, that made listening to all those news sound bites a little bit more interesting.

Video Tutorial

Premiere Tutorial: Adding video transitions

For my tutorial, I’m going to show you how to add video transitions between video clips in Premiere. It’s really not that difficult, but it was something that didn’t come so easily to me at first when I was doing it, so I thought I would share this trick.

1) Click on the Effect Panel near the top of the screen. It should open up an Effects panel somewhere on your screen. In the screenshot below, the Effects panel opens up to the left of the screen.

tut1

You can see in the Effects Panel that there are a variety of video and audio effects. I have the video transitions tab lengthened, so you can see all of the different types of video transitions.

2) I’ve selected the dissolve tab to pick the transition I want that includes a dissolve of some type. As you can see in the screenshot below, there’s a variety of different transitions you can choose from this dissolve tab. I’ve selected the Dip to Black transition in this screenshot.

tut2

After selecting the transition you want and setting up the video clips you want to place the transition between, all you have to do is drag the transition you selected from the Effects Panel and drop the transition between the to video clips. In the screenshot above, I’ve just dropped a transition between two clips towards the right hand side of the timeline.

3) After dropping the transition effect on the timeline, it should look like the transitions on the timeline in the screenshot below. From here, you should be able to manipulate the transition. You can elongate the transition with the select tool or you can alter the transition’s starting point.

tut3

Video Project Proposal

When initially thinking about what I should do for my video project, I thought about something I already enjoy that I could put my own spin on, so actually doing the project would not be unbearable. I am already a huge music fan, so I thought I should probably do a project with one of my favorite music videos.

For my video project, I’m going to try and do a sort of mashup remix with Lupe Fiasco’s song “Paris, Tokyo.” The song’s premise is about traveling, more notable falling asleep in one location and waking up in another location. In fact, in the video, the artist is traveling the globe through a variety of different ways. So, what I wanted to do is collect a bunch of videos of planes and trains through Creative Commons and mash that up with the Lupe Fiasco’s video for Paris, Tokyo. I gathered up a group of general “transportation” videos from Flickr. I would leave the URL’s of all of the videos I gathered, but they are each entirely too long. I’m also using Lupe’s actual “Paris, Tokyo” video, and I will be taking snippets from that video as well to put everything together. The whole time I will have the audio of the actual song playing during this entire video.

One of the reasons I enjoyed the song so much was because it was smooth and gave you an easy-going feeling when listening to it. Hopefully, my remix will evoke similar feelings in those who choose to watch it.

I do not know too much with Adobe Premiere, so most of the effects I will be using will mostly be cutting video and rearranging them, but I hope to gain some knowledge in some simple effects. This way there will be smooth transitions between sections of video.

Lupe Fiasco – (Paris, Tokyo):  https://www.youtube.com/watch?v=pp2uqGLNm5k

Rick Ross – “Hello (Adele Remix)”

For the remix I chose, it’s the rapper Rick Ross adding a verse to Adele’s “Hello.” This is technically a remix in the general sense when someone is typically thinking about when a song is remixed, but it is unusual in the terms of who is remixing what. I would say that it’s creatively reworking the original “Hello” because of the new vocals laid down by Rick Ross on top of the original song’s production. It doesn’t so much transform the source media’s meaning, but it kind of alters the way the listener chooses to view the song. Instead of paying attention to Adele’s lyrics, there’s a whole other artist to pay attention to. Using the source media, Rick Ross took what the original song embodies and puts his own personal spin on it. He even goes with a more introspective verse to go along with the vibe Adele offered up in the original song.

One of the reasons I actually chose this remix is because it really is made for a different audience than the source’s audience. Adele is making pop music with more of a mainstream audience, while Rick Ross is making rap music. But, I think that a remix like this where it cuts through genres is always an interesting thing to listen to. I find it intriguing to look into how a song works with one audience, then see how changes (a remix) made to that song can be tailored to an entirely different audience.

While there’s no change in the original instrumental nor is there a change/removal in any of Adele’s original vocals, I believe that it is still a remix worth listening to it. No elements are brought in from any distinct media objects. While this is not the most complex remix to have ever been made, I really do still enjoy it.


https://www.youtube.com/watch?v=8OgwFPDDdFQ