The Uncle Who Works for Nintendo prompt

For the Twine game that I decided to write about was “The Uncle Who Works fro Nintendo”. I felt like this Twine as a whole was very interesting and seemed to mirror a lot of the qualities of other Twines that I’v played so far for class. One thing that seems to be very similar with all the Twine games is that they all have a very dark background to them. They give out an eerie vibe of something bad happening and usually hint to death or destruction.

Throughout the entire game, you begin to notice after the first two or three slides of the game that you have an array of options to choose from. But it really doesn’t become completely evident until you get to the point of sitting in the Den with your friend waiting for the clock to strike midnight. During that time, there are upwards of five different options that you can choose which sometimes led to more options. In my opinion, I never really felt like any of the choices I was making were going to have any real consequences. At some points, I thought that if I chose one option over the other, I might have gotten into a fight with the friend I was with but besides that, nothing felt too drastic.

With this Twine, image plays a large part in the backdrop of the game. It’s always there behind the text and always toned town somewhat which gives the game and setting a more eerie feeling to it. Sound is used sparingly and is usually only prominent when the clock is striking at 12 indicating that it’s one step closer to midnight. I think these elements add to the dark feeling that the game is trying to convey. These elements, in my opinion, work well with one another. If the images were too bold or there were too many sounds being added in at every minute, it would’ve made the game feel tacky and not as dark.

Color throughout was very dark which seemed to suite the game very well. Font didn’t seem to play a large part of the game until the end when the until came in and the letters began to turn into symbols. I think the transition from letters to symbols added to the effect of feeling as if it was the person’s own computer malfunctioning which I think was a goal of the creators. Overall, I found this game to be somewhat boring, and that could easily be due to my need for something more intriguing to my mind. But I think the whole concept is really fascinating, but I’m not sure what I would change or do differently to make the actual game more captivating.

Prompt: Blog 5

For this post, write about a moment (or several moments) that you found interesting in a Twine game. Some questions to consider: when do you notice having to choose your path through the story? Do any moments of choice feel particularly consequential? How do the games incorporate sound and image, and what do these elements add to the experience of playing? Do you notice color or font choice? Effects or transitions? Blog 5 should be ~300 words, and is due Sunday, 3/13 by 11:59PM.

Tutorial for Making Sounds “Pass By”

My tutorial is for making a sound clip seem like it starts in one ear, moves into both, then out the other. It’s useful to make things sound like they’re passing by you.

Step 1:

Screen 1

To start, you pick the audio clip that you want to apply this effect to. You can tell that I’ve already applied the effect to this clip because the top and bottom (left and right ears respectively) have different visuals.

Step 2:

Screen 2

Next you click the down arrow next to the name of the track that you’re working with. You select the “Split Stereo Track” option. This splits the top and bottom so that you can work them separately.

Step 3:

Screen 3

Select whichever side you want the sound to begin in. In my case, I picked the left ear (top track). Once it’s selected, you add the “Fade Out” effect to it. This makes it so that, throughout the clip, it gets quieter. But since you’ve split the left and right ears, it means that only this one will fade out.

Step 4:

Screen 4

After that, you select the other track and apply the “Fade In” effect to it. This gives the illusion of the sound not being in this ear at the beginning of the clip, but growing louder the whole time.

Step 5:

Screen 5

The last step is to rejoin the tracks. You do this by going into the drop down menu next to the top track and clicking “Make Stereo Track”. This makes it so you can no longer edit each track individually, and you can edit them as one. Rejoining them will make your life easier because you can move them precisely together, adjust the volume level of the clip uniformly, or do anything else you need without having to replicate it on the other half of the track.

Silencing Audio in Audacity

Step 1: Select the audio that you want to work on. This is going to be the audio that you will silence a portion of. This screenshot shows the selected part of the audio track that I am planning on silencing.

audio1

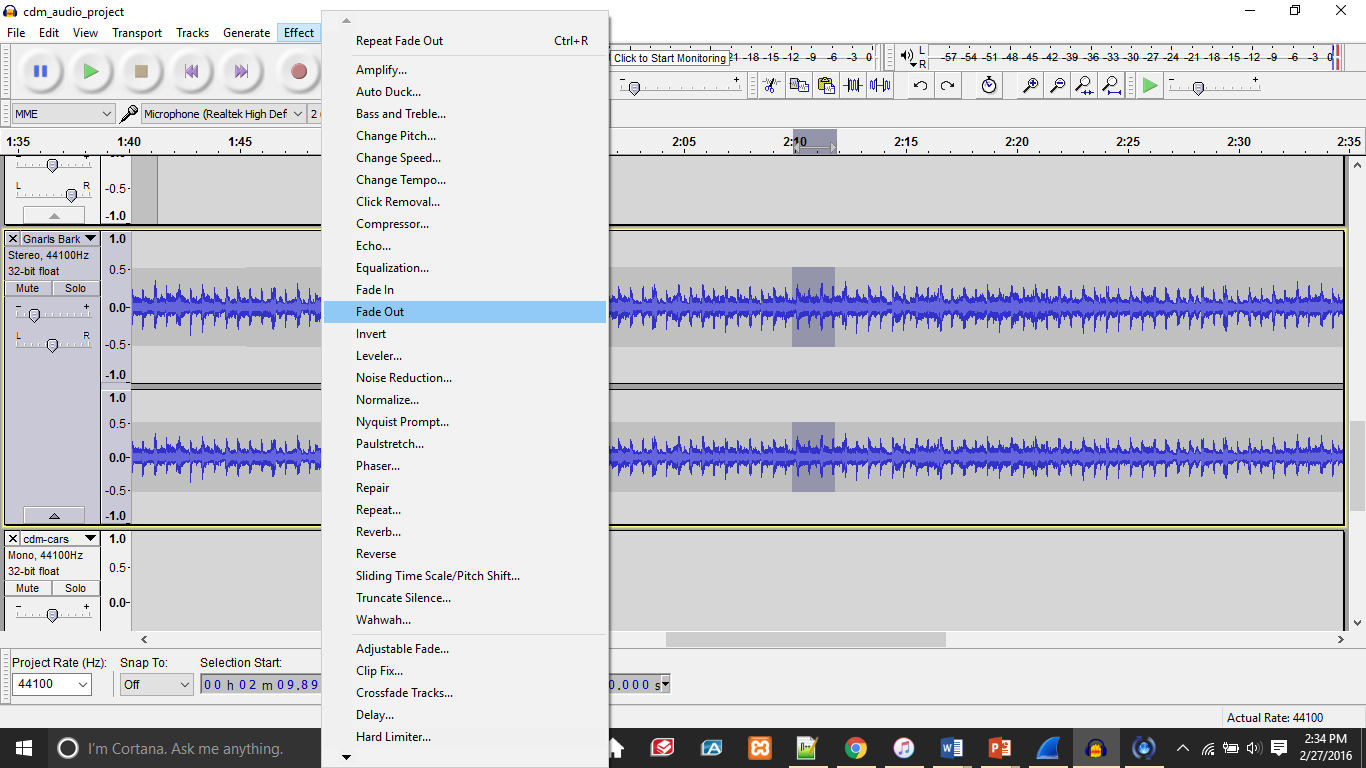
Step 2: I selected a small section before the place where I want to silence the track, and click to fade it out before silencing the upcoming part, so the silence sounds more natural. I do this by going to effects and clicking Fade Out as you can see in the screenshot below.

audio2


Step 3: I then take the selected portion of what I want to silence, and I go up top to the tool that say Silence Audio. After clicking that button, the audio is silenced.

audio4


Step 4:  I then select a portion of the audio track after what I silence to fade it back in naturally. I select Fade In from the Effect tab, and that sound fades in.

audio3

audio5

Tutorial: How to Increase Bass in Audacity

Step 1: First of all import the audio file that you wish to work with.Beginnning

Step 2: Now select the portion of the audio that you want to work with within the file.  Do this by using the selection tool.  Click at the beginning of the part you wish to work with then drag to the end point that you want.Selection

Step 3: Then go the drop down menu labeled “Effects” and select Bass and Treble.Bass Selection

Step 4:  A pop-up box will show up.  Type in the amount of Bass you want to add to the selection that you picked by adjusting the dB amount of Bass using the slider or typing in the amount.  You can preview the change by clicking preview.  Then click okay when you are happy with the change.Bass Level

Step 5:  After you click “OK” the change will take place.  You can undo the change by pressing “Ctrl+Z” or by clicking the “Edit” drop down menu and selecting “Undo Bass and Treble”.  Congratulations you’ve adjusted the Bass!  You should see the change in the selections waveform.Ending

How to Adjust Speed in Audacity

  1. In order to change the speed of a certain time frame of sound, first choose the track you want to speed up, and highlight the part you want to change.

tutorial1

2. Once it is highlighted, drag the mouse up to the toolbar, and choose the tab “Effect.”

tutorial2

3. In the “Effect Tab,” choose the the option “Change Speed…”

tutorial3

4. The window for “Change Speed” will appear. IN the box, there is a dial that can be pushed to the left or the right to either speed up or slow down the sound. Move it to the percentage and speed multiplier that you want, and then press OK.

tutorial4

5. Then, the speed of the soundbite has changed.

Audio Tutorial: How to record voice into GarageBand

  1. If plugging in microphone, make sure there is proper connection via usb
  2. Go to Apple menu and then System Preferences
  3. Go to “Sound” selection
  4. Make sure both input and output have the proper selected microphone
    • if using an external microphone, this microphone should appear beneath “internal speakers” in output and “internal microphone” in input
    • you can adjust the maximum input and output volumes here
  5. Screen Shot 2016-03-02 at 12.36.01 AM Screen Shot 2016-03-02 at 12.35.39 AM
  6. Once microphone is properly selected, open GarageBand and create a New Project
    • select vocal recording
    • If recording in a podcast style, use narration voice to eliminate echo
  7. To record, hit the red button on the top lefthand side of the window
    • Voice will record into first track
    • hit the red button to stop and begin recording within the same trackScreen Shot 2016-03-02 at 12.37.03 AM
  8. Export recording as an mp3 to edit in Audacity or any other audio editing software

Audacity Tutorial – How to Amplify a Sound

For my tutorial, I decided to show how you can amplify a specific section of a clip to sound louder if the envelope tool doesn’t work out. For example, in many instances during my project I ran into the problem that my self-recorded sounds were always much quieter than the ones I got online. They would appear as straight lines, as pictured below.

pic1

As you can see the first clip (titled voice) is much quieter (as represented by the straightness of the line) than the second clip (titled radio). In order to hear the voice over the radio it must be amplified. You could just turn down the radio volume and turn up the voice volume, but when more clips get introduced this can lead to problems where the radio is too quiet or the voice is still too quiet. The envelope tool really is of not help either, as there isn’t much to pull up.

The answer then is to amplify. To do this, first highlight the portion of the clip you wish to amplify with the Selection Tool, as pictured below.

pic2

Next, go to the Effect tab (3rd from the right) and find the effect titled Amplify, as shown below.

pic3

Clicking on the Amplify option will open up the below box prompting you to make changes to the amplification. The only feature in this box you need to worry about is the first box and/or the sliding scale directly below that. These are circled in red.

pic4

To amplify the sound, you can either input a greater number into the first box or slide the bar to the right. To do the opposite (aka make the sound quieter) you can input a smaller number into the box or slide the bar to the left. This is shown below.

pic5

When you’re done adjusting the values whichever way you please (for the purpose of this tutorial I adjusted my sound to be amplified, so louder) click OK. You can also click Preview to hear the sound and decide on whether it needs to be adjusted further or not. If you amplify the sound, the straight line should appear more jagged, like that of the radio clip, as seen below circled in red.

pic6

The sound is now amplified and will be louder!