Tag Archives: tutorial

Twine Tutorial

When I code or do anything that requires building, I have to be actively organized. I need a non-dynamic flow for my thoughts and produced work so I can revisit for either review or looking back to regain a thought stream. I noticed many students while making Twines had the passage boxes all over the screen in clusters. If I were someone reviewing the work, this lack of organization would drive me up a wall.

So I’m going to show a simple trick many people didn’t utilize: snapping to grid. It’s super simple and maybe too elementary for a tutorial, but I think for design’s sake it is incredibly important.

If your twine looks a bit like this…
Screen1

You may need to use snap to grid.

First, go to the view button and click “Snap to Grid”.screen2

Nothing will snap automatically, yet; however, if you try to move something, the box will snap to a grid immediately. You’ll have to do some moving around to get the boxes in the order you’d like. Eventually your setup can look nice an organized like so:screen3

If you want to be able to check if all your links are set easily and see the progression of your twine, I laid my boxes out in a straight line, with the main story line in the middle, with linked photos and off-story choices creating branches or stacking on-top of relevant links.

screen4

This way I can see how my story progresses without actually playing it and it makes it easier to check and catch errors you may not find unless you play every single story combination. As your game grows, this becomes more difficult, with each new choice you add comes another factorial of combinations. MATH!

Silencing Audio in Audacity

Step 1: Select the audio that you want to work on. This is going to be the audio that you will silence a portion of. This screenshot shows the selected part of the audio track that I am planning on silencing.

audio1

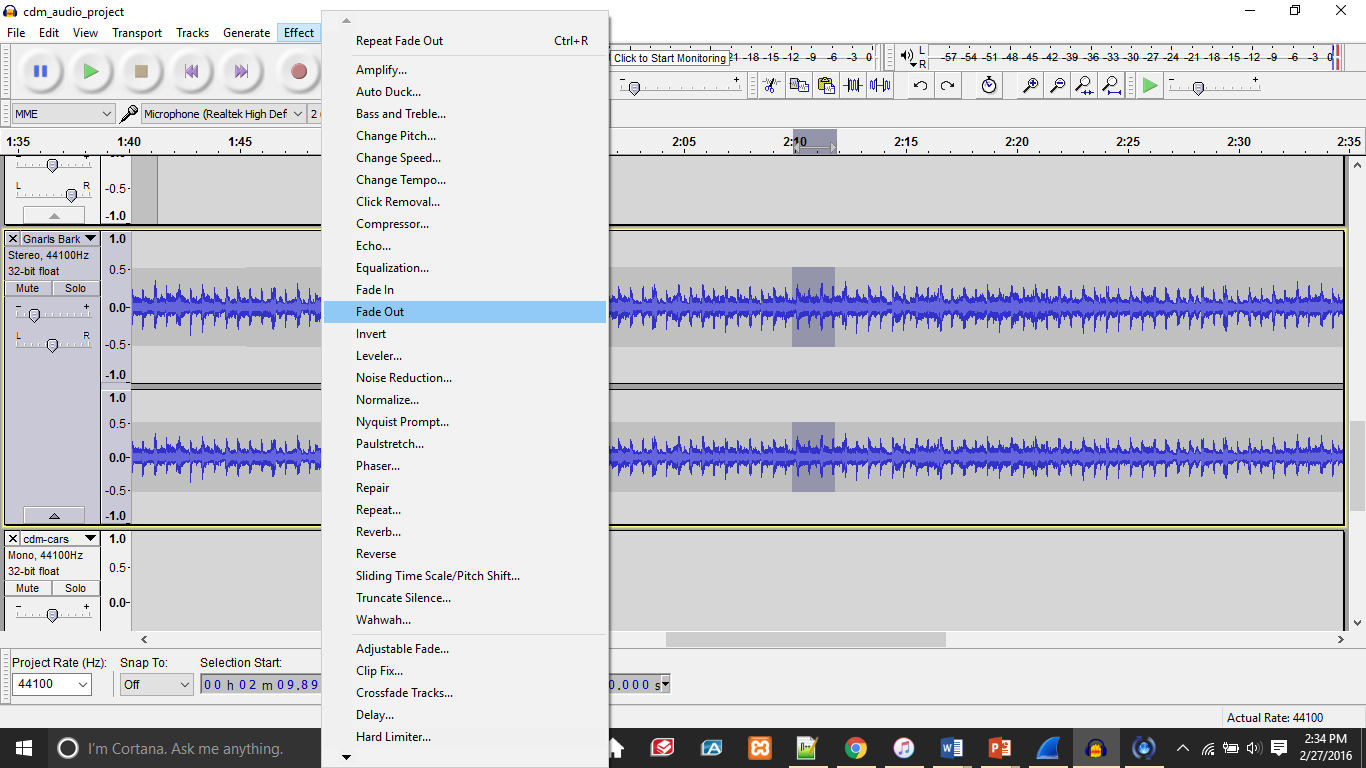
Step 2: I selected a small section before the place where I want to silence the track, and click to fade it out before silencing the upcoming part, so the silence sounds more natural. I do this by going to effects and clicking Fade Out as you can see in the screenshot below.

audio2


Step 3: I then take the selected portion of what I want to silence, and I go up top to the tool that say Silence Audio. After clicking that button, the audio is silenced.

audio4


Step 4:  I then select a portion of the audio track after what I silence to fade it back in naturally. I select Fade In from the Effect tab, and that sound fades in.

audio3

audio5

Tutorial: How to Increase Bass in Audacity

Step 1: First of all import the audio file that you wish to work with.Beginnning

Step 2: Now select the portion of the audio that you want to work with within the file.  Do this by using the selection tool.  Click at the beginning of the part you wish to work with then drag to the end point that you want.Selection

Step 3: Then go the drop down menu labeled “Effects” and select Bass and Treble.Bass Selection

Step 4:  A pop-up box will show up.  Type in the amount of Bass you want to add to the selection that you picked by adjusting the dB amount of Bass using the slider or typing in the amount.  You can preview the change by clicking preview.  Then click okay when you are happy with the change.Bass Level

Step 5:  After you click “OK” the change will take place.  You can undo the change by pressing “Ctrl+Z” or by clicking the “Edit” drop down menu and selecting “Undo Bass and Treble”.  Congratulations you’ve adjusted the Bass!  You should see the change in the selections waveform.Ending

Audacity Tutorial – How to Amplify a Sound

For my tutorial, I decided to show how you can amplify a specific section of a clip to sound louder if the envelope tool doesn’t work out. For example, in many instances during my project I ran into the problem that my self-recorded sounds were always much quieter than the ones I got online. They would appear as straight lines, as pictured below.

pic1

As you can see the first clip (titled voice) is much quieter (as represented by the straightness of the line) than the second clip (titled radio). In order to hear the voice over the radio it must be amplified. You could just turn down the radio volume and turn up the voice volume, but when more clips get introduced this can lead to problems where the radio is too quiet or the voice is still too quiet. The envelope tool really is of not help either, as there isn’t much to pull up.

The answer then is to amplify. To do this, first highlight the portion of the clip you wish to amplify with the Selection Tool, as pictured below.

pic2

Next, go to the Effect tab (3rd from the right) and find the effect titled Amplify, as shown below.

pic3

Clicking on the Amplify option will open up the below box prompting you to make changes to the amplification. The only feature in this box you need to worry about is the first box and/or the sliding scale directly below that. These are circled in red.

pic4

To amplify the sound, you can either input a greater number into the first box or slide the bar to the right. To do the opposite (aka make the sound quieter) you can input a smaller number into the box or slide the bar to the left. This is shown below.

pic5

When you’re done adjusting the values whichever way you please (for the purpose of this tutorial I adjusted my sound to be amplified, so louder) click OK. You can also click Preview to hear the sound and decide on whether it needs to be adjusted further or not. If you amplify the sound, the straight line should appear more jagged, like that of the radio clip, as seen below circled in red.

pic6

The sound is now amplified and will be louder!

Audio Tutorial: Changing Pitch in Audacity

Changing the pitch of an audio clip is relatively simple.

First, highlight the audio clip you want to change the pitch of using the selection tool.

Screen Shot 2016-02-28 at 7.23.26 PM

Next, go to the top of the screen, click on “Effects” and then scroll down to where it says “Change Pitch“. Click on “Change Pitch“.

Screen Shot 2016-02-28 at 7.23.39 PM

Here is where you will change the actual pitch. The left drop down box lets you choose a starting pitch (what the pitch of the selected clip currently is), the right drop down box lets you choose an ending pitch (what you would like the pitch to be after having been changed). There are other settings, but adjusting the starting and ending pitch is the simplest way to change the pitch of a sound. You don’t necessarily need to know what your starting pitch is. If you’re not familiar with music, the best way to make the pitch higher is choose a note and then that note as a sharp (starting pitch: A ending pitch: A#). The best way to make the pitch lower to choose a note and then that note as a flat (starting pitch: B ending pitch: B). Select your starting and ending pitch and then click OK in the bottom left of the dialog box.

Screen Shot 2016-02-28 at 7.24.03 PM


All done! After clicking OK the dialog box should disappear and the pitch of your selected clip should be altered.

Screen Shot 2016-02-28 at 7.23.14 PM


Title Tutorial

In my video project, I had 35 different title “slides”. These are useful because you can overlay text in order to give the viewer more information about what’s going on. For my video, I used it to tell the viewer what type of animal was on screen at that time.

To start with, you open up the project that you’re going to add a title on. Then you click on the “Title” tab on the sequence box. On this screen, you click the film icon with a “T” on it, this creates a new title.

Screen 1

Creating the new title opens up this box where you can change specifics about the title card. Here you can name the title whatever you want. The name doesn’t really matter, just something so that you remember what title card says what.

Screen 2

Once you hit “OK”, it goes back to the sequence. But now you can click anywhere on your video to add text. After you’ve typed what you want to display, there is all sorts of properties you can change over on the right. For example you can change the font, size, or color of the text. You can also readjust where the words are positioned on the screen.


Screen 3

When you’re satisfied with your title card, you drag it onto the video timeline from the source box just like any video or sound clip. It’s possible to adjust how long the title card is on the screen just like adjusting the length of a clip.

That’s all there is to overlaying words on a video in Premier CC.